Table of Contents
Tutorial 6 - Lighting
by Richard Russell, August 2015
Note that the code in this tutorial requires Windows 8.1 or Windows 10
This tutorial is closely based on Microsoft's Direct 3D 11 Tutorial 6 but with the code translated from C++ to BBC BASIC for Windows. You should refer to the original for a detailed explanation of the code.

Summary
In the previous tutorials, the world looks boring because all the objects are lit in the same way. This tutorial will introduce the concept of simple lighting and how it can be applied. The technique used will be lambertian lighting.
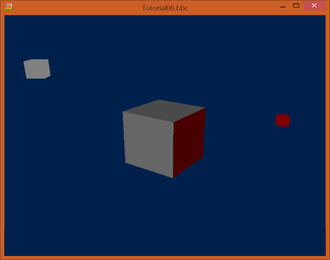
The outcome of this tutorial will modify the previous example to include a light source. This light source will be attached to the cube in orbit. The effects of the light can be seen on the centre cube.
Source
The source files, libraries etc. may be downloaded from here.
Lighting
In this tutorial, the most basic type of lighting will be introduced: lambertian lighting. Lambertian lighting has uniform intensity irrespective of the distance away from the light. When the light hits the surface, the amount of light reflected is calculated by the angle of incidence the light has on the surface. When a light is shone directly on a surface, it is shown to reflect all the light back, with maximum intensity. However, as the angle of the light is increased, the intensity of the light will fade away.
Initializing the Lights
In this tutorial, there will be two light sources. One will be statically placed above and behind the cube, and another one will be orbiting the center cube. Note that the orbiting cube in the previous tutorial has been replaced with this light source.
Since lighting is computed by the shaders, the variables would have to be declared and then bound to the variables within the technique. In this sample, we just require the direction of the light source, as well as its colour value. The first light is grey and not moving, while the second one is an orbiting red light.
        REM Setup our lighting parameters:
        DIM vLightDir0(3), vLightDir1(3), vLightColor0(3), vLightColor1(3)

        vLightDir0() = -0.577, 0.577, -0.577, 1.0
        vLightColor0() = 0.5, 0.5, 0.5, 1.0
        vLightColor1() = 0.5, 0.0, 0.0, 1.0
The orbiting light is rotated just like the cube in the last tutorial. The rotation matrix applied will change the direction of the light, to show the effect that it is always shining towards the center:
          REM Rotate the second light around the origin
          PROC_MatrixRotation(mRotate(), 0, 2*t, 0)
          vLightDir1() = 0.0, 0.0, -1.0, 1.0
          vLightDir1() = vLightDir1() . mRotate()
The lights' direction and colour are both passed into the shader just like the matrices. The associated variable is called to set, and the parameter is passed in.
          REM Update matrix and lighting variables:
          PROC_MatrixTranspose(ConstantBuffer{}, ConstantBuffer.mWorld{}, mWorld())
          PROC_StoreFloat4(ConstantBuffer{}, ConstantBuffer.vLightDir1{}, vLightDir1())
          SYS ID3D11DeviceContext.UpdateSubresource%, pImmediateContext%, pConstantBuffer%, \
          \                                           0, NULL, ConstantBuffer{}, 0, 0
Rendering the Lights in the Pixel Shader
Once we have all the data set up and the shader properly fed with data, we can compute the lambertian lighting term on each pixel from the light sources. We'll be using the dot product rule discussed previously.
Once we've taken the dot product of the light versus the normal, it can then be multiplied with the color of the light to calculate the effect of that light. That value is passed through the saturate function, which converts the range to [0, 1]. Finally, the results from the two separate lights are summed together to create the final pixel color.
Consider that the material of the surface itself is not factored into this light calculation. The final color of the surface is a result of the light's colors.
      //
      // Pixel Shader
      //
      float4 PS( PS_INPUT input) : SV_Target
      {
          float4 finalColor = 0;

          //do NdotL lighting for 2 lights
          for(int i=0; i<2; i++)
          {
              finalColor += saturate( dot( (float3)vLightDir[i],input.Norm) * vLightColor[i] );
          }
          return finalColor;
      }
Once through the pixel shader, the pixels will be modulated by the lights, and you can see the effect of each light on the cube surface. Note that the light in this case looks flat because pixels on the same surface will have the same normal. Diffuse is a very simple and easy lighting model to compute. You can use more complex lighting models to achieve richer and more realistic materials.
